Pre-chilling vs Pre-sprouting Infographic

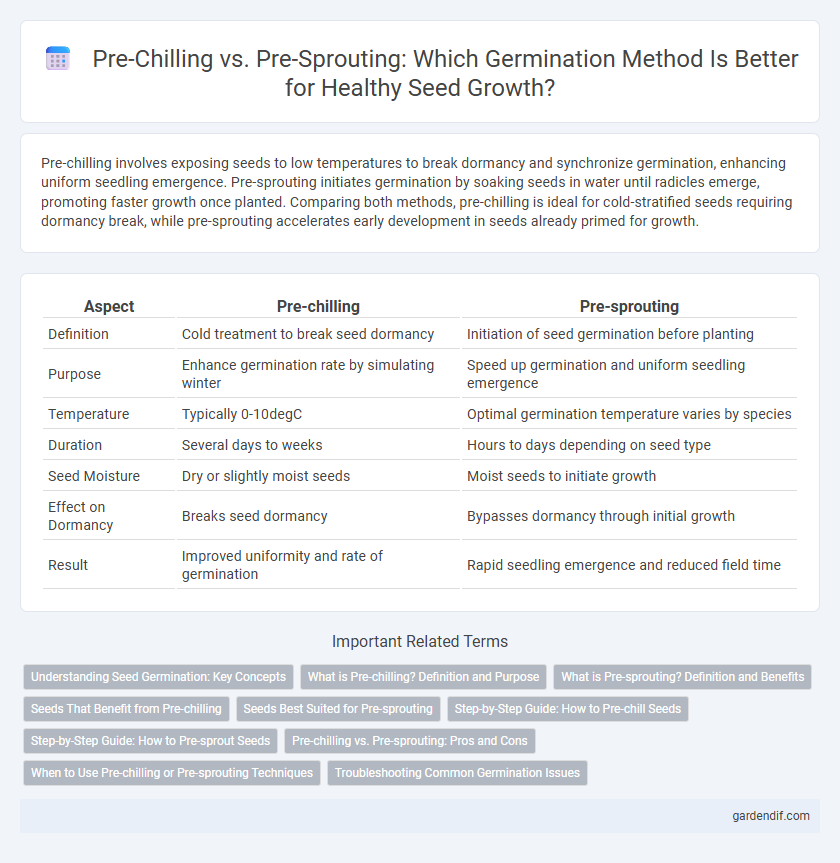
Pre-chilling involves exposing seeds to low temperatures to break dormancy and synchronize germination, enhancing uniform seedling emergence. Pre-sprouting initiates germination by soaking seeds in water until radicles emerge, promoting faster growth once planted. Comparing both methods, pre-chilling is ideal for cold-stratified seeds requiring dormancy break, while pre-sprouting accelerates early development in seeds already primed for growth.
Table of Comparison
| Aspect | Pre-chilling | Pre-sprouting |
|---|---|---|
| Definition | Cold treatment to break seed dormancy | Initiation of seed germination before planting |
| Purpose | Enhance germination rate by simulating winter | Speed up germination and uniform seedling emergence |
| Temperature | Typically 0-10degC | Optimal germination temperature varies by species |
| Duration | Several days to weeks | Hours to days depending on seed type |
| Seed Moisture | Dry or slightly moist seeds | Moist seeds to initiate growth |
| Effect on Dormancy | Breaks seed dormancy | Bypasses dormancy through initial growth |
| Result | Improved uniformity and rate of germination | Rapid seedling emergence and reduced field time |
Understanding Seed Germination: Key Concepts
Pre-chilling enhances seed germination by exposing seeds to cold temperatures, breaking dormancy and mimicking natural winter conditions necessary for hormonal activation. Pre-sprouting involves initiating seed germination under controlled moisture and temperature, accelerating root and shoot development before planting. Understanding these techniques highlights their roles in overcoming dormancy and improving germination rates for various crop species.
What is Pre-chilling? Definition and Purpose
Pre-chilling, also known as stratification, is a controlled exposure of seeds to low temperatures to break dormancy and enhance germination rates. This process mimics natural winter conditions, triggering biochemical changes that prepare the seed for sprouting once favorable warmth returns. Pre-chilling improves uniform seedling emergence and accelerates germination in cold-sensitive species like apples, cherries, and maples.
What is Pre-sprouting? Definition and Benefits
Pre-sprouting is the process of initiating seed germination by soaking seeds in water until the radicle emerges before planting, enhancing uniform and rapid seedling establishment. This technique accelerates seedling growth, improves germination rates, and reduces field emergence time compared to traditional sowing methods. Benefits include higher crop yields, better resource utilization, and increased resistance to adverse environmental conditions during early growth stages.
Seeds That Benefit from Pre-chilling
Seeds from temperate and cold-climate plants, such as apple, cherry, and lettuce, benefit significantly from pre-chilling, which breaks seed dormancy by simulating winter conditions. Pre-chilling involves exposing seeds to low temperatures for several weeks, promoting uniform and faster germination once planted. This method is crucial for species with physiological dormancy, ensuring higher germination rates and improved seedling vigor compared to pre-sprouting techniques.
Seeds Best Suited for Pre-sprouting
Seeds best suited for pre-sprouting typically include large, hard-coated legume seeds such as beans, peas, and lentils, which benefit from the early initiation of germination to overcome dormancy. Pre-sprouting accelerates seedling development by allowing root and shoot emergence before planting, enhancing uniformity and vigor in crops like cucumbers and squash. Compared to pre-chilling, pre-sprouting is more effective for species with relatively rapid germination cycles that respond well to controlled moisture and temperature conditions during the sprout phase.
Step-by-Step Guide: How to Pre-chill Seeds
Pre-chilling seeds involves placing them in a moist medium like damp paper towels or vermiculite, then sealing them in a plastic bag and refrigerating at 1-5degC (34-41degF) for 1-4 weeks to simulate winter conditions and break dormancy. Regularly check moisture levels to prevent drying and ensure the seeds do not freeze, as proper temperature control is critical for effective stratification. After pre-chilling, transfer seeds to a warm, well-lit environment to initiate germination and monitor root emergence before planting.
Step-by-Step Guide: How to Pre-sprout Seeds
To pre-sprout seeds, start by soaking them in water for 12 to 24 hours to soften the seed coat and enhance moisture absorption. Next, place the soaked seeds between damp paper towels or in a moist medium like vermiculite, ensuring consistent humidity and warmth around 20-25degC for optimal germination. Monitor daily for root emergence, then transplant the sprouts carefully into soil or growing containers once the radicle reaches 1-2 cm in length for successful seedling development.
Pre-chilling vs. Pre-sprouting: Pros and Cons
Pre-chilling enhances seed germination by breaking dormancy through exposure to low temperatures, improving uniformity and seedling vigor, but risks damage if temperatures or durations are not carefully controlled. Pre-sprouting accelerates germination by initiating radicle emergence before planting, offering faster establishment and higher early growth rates, though it requires precise handling to prevent desiccation and reduces seed storability. Choosing between pre-chilling and pre-sprouting depends on seed type, environmental conditions, and operational considerations such as timing and resource availability.
When to Use Pre-chilling or Pre-sprouting Techniques
Pre-chilling is most effective for seeds requiring cold stratification to break dormancy, such as apples and cherries, promoting uniform germination in temperate climates. Pre-sprouting suits quick-growing crops like beans and corn, enabling faster germination and earlier transplanting in warm, controlled environments. Selecting between pre-chilling and pre-sprouting depends on species-specific dormancy traits and the growing season's length.
Troubleshooting Common Germination Issues
Pre-chilling seeds helps overcome dormancy by simulating winter conditions, improving germination rates for cold-requiring species, while pre-sprouting initiates early growth by soaking seeds to trigger metabolic activity. Troubleshooting common germination issues involves ensuring proper temperature and moisture levels during pre-chilling, preventing mold or rot by maintaining aeration and sterilizing substrates during pre-sprouting. Adjusting these parameters based on species-specific requirements enhances seed viability and uniform seedling emergence.
Pre-chilling vs Pre-sprouting Infographic